
Set up TekLan VPN on a compatible router
Check which VPN protocol your router supports, then create and import the matching Dashboard configuration.
Import a .conf tunnel
Check that your router firmware includes a WireGuard client and supports configuration-file imports.
Before you begin
- Confirm the router supports the protocol used by this method.
- Sign in to the router administration page and back up its current settings.
- Keep the TekLan VPN Dashboard open in another tab.
Move the WireGuard profile to this device
After creating the profile, choose the delivery route that suits where the Dashboard is open.
- Download profile: save the
.conffile directly on this device. - Email: select Send profile, choose Email and select Queue email. The Dashboard sends the
.confattachment to your account email address. - Device access code: select Send profile, then Get code. On this device, open dash.teklanvpn.com/get, enter the code and select Download profile. The code expires after 15 minutes and works once. Generating another code replaces it.
- In the client area, open your active VPN service and select Manage VPN Dashboard.
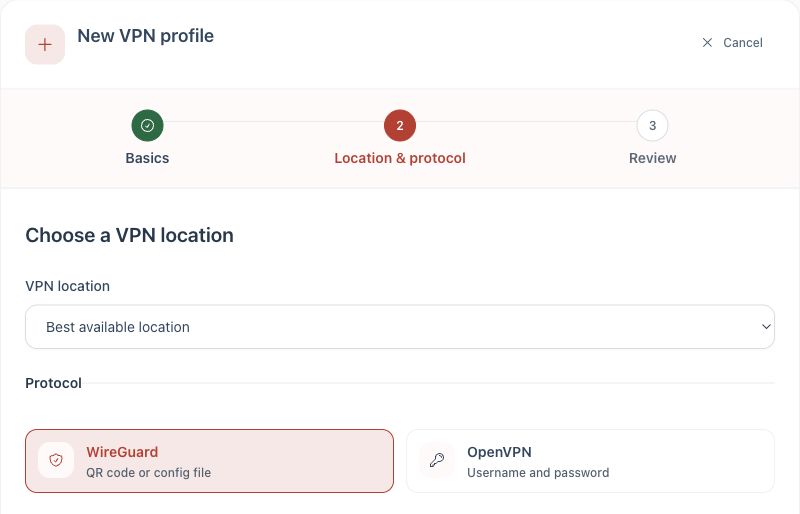
- Select Add device and give the router a recognisable name.
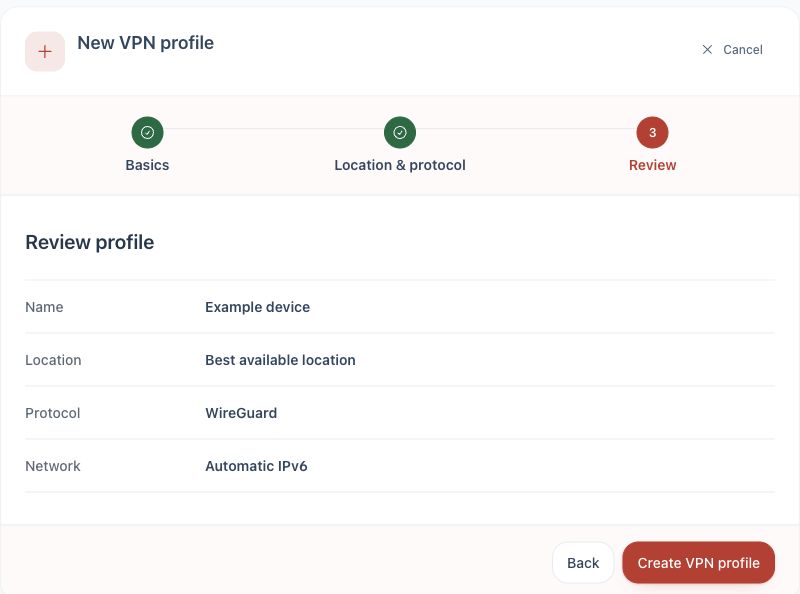
- Choose WireGuard, review the details and create the profile.
- Download the generated
.conffile. - Open the WireGuard client in the router’s administration interface and import the file.
- Save and activate the tunnel. Menu and field names vary between router manufacturers.
Check the connection
- Confirm the router VPN client reports Connected.
- Assign one test device to the VPN policy.
- On that device, confirm the public IP address changes.
- Disconnect the router tunnel and confirm the normal route returns.
If it does not connect
- Confirm the imported file matches the selected router firmware and protocol.
- Generate and import a fresh profile if the saved one was replaced.
- Check the router date, time and DNS settings.
- Remove an older VPN client using the same policy before testing again.
Choose the router in the Dashboard
The Dashboard changes its instructions to match the selected router. Current choices include GL.iNet, ASUSWRT, UniFi, OpenWrt, pfSense Plus, TP-Link or Deco and MikroTik RouterOS 7.
Before you begin
- Confirm the router supports the protocol used by this method.
- Sign in to the router administration page and back up its current settings.
- Keep the TekLan VPN Dashboard open in another tab.
Move the OpenVPN profile to this device
- Download profile: save the
.ovpnfile directly on this device. - Email: select Send profile, choose Email and select Queue email. The Dashboard sends the
.ovpnattachment to your account email address. - OpenVPN credentials: select Show OpenVPN credentials and keep the displayed profile username and password available. The password unlocks the private key inside the file. It is not your TekLan VPN password.
Device access codes are for WireGuard profiles only. OpenVPN uses the downloaded or emailed .ovpn file with the credentials shown in the Dashboard.
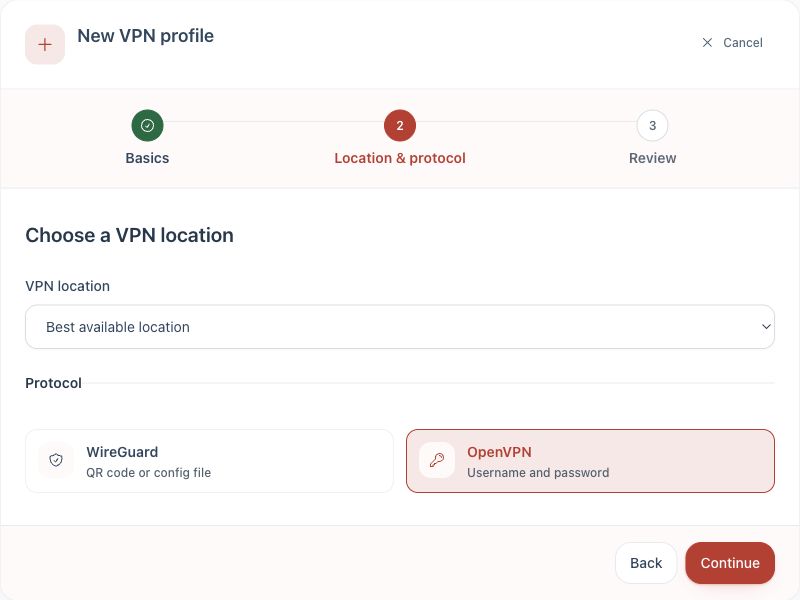
- Create an OpenVPN profile for the router.
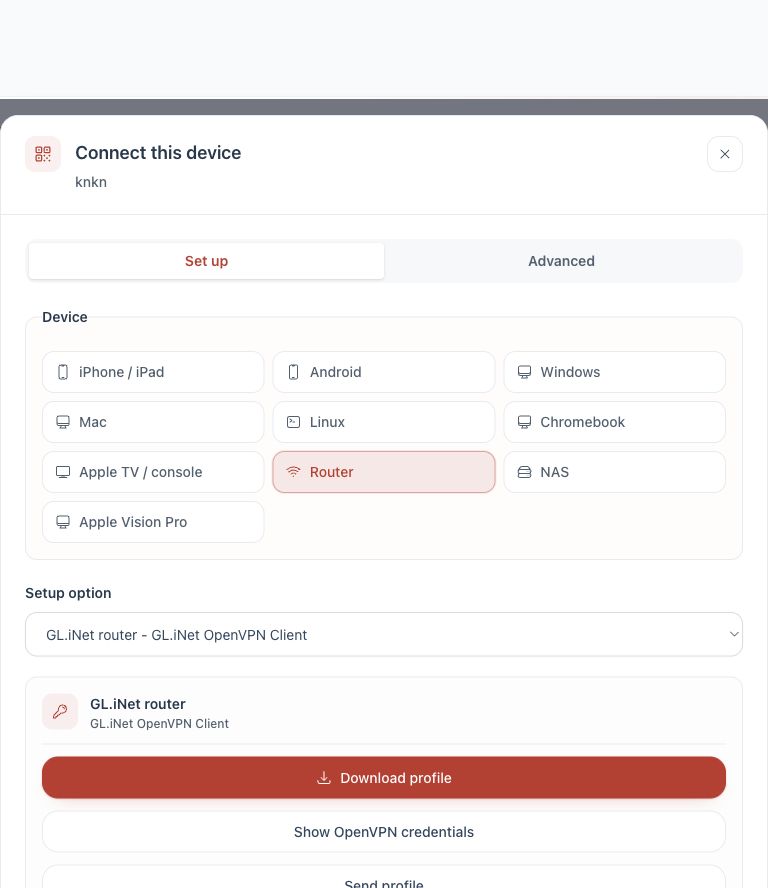
- Select Connect device and choose Router.
- Select the exact router or firmware under Setup option.
- Use Download profile, Show OpenVPN credentials or Send profile as directed.
- Follow the connection steps displayed for that router. Do not substitute instructions written for different firmware.
Check the connection
- Confirm the router VPN client reports Connected.
- Assign one test device to the VPN policy.
- On that device, confirm the public IP address changes.
- Disconnect the router tunnel and confirm the normal route returns.
If it does not connect
- Confirm the imported file matches the selected router firmware and protocol.
- Generate and import a fresh profile if the saved one was replaced.
- Check the router date, time and DNS settings.
- Remove an older VPN client using the same policy before testing again.
Choose your router or firmware
Use the instructions for the administration interface actually running on your router. A manufacturer name alone is not enough if the router has been flashed with different firmware.
GL.iNetOpenVPN or WireGuard client
Import the TekLan profile
- Update the router, back up its settings and sign in to the GL.iNet administration panel.
- Create a separate WireGuard or OpenVPN profile in the TekLan Dashboard and download the corresponding
.confor.ovpnfile. - Open VPN Dashboard, choose WireGuard Client or OpenVPN Client, then add a new configuration.
- Upload the downloaded file. For OpenVPN, use the profile username and password shown by Show OpenVPN credentials.
- Start the profile and use GL.iNet’s VPN policy controls if only selected devices should use TekLan VPN.
Check: confirm the client is active in VPN Dashboard, then test the public IP address from a device assigned to that policy.
ASUSWRT and VPN FusionOpenVPN or supported WireGuard models
Add a VPN client profile
- Check the ASUS specification page for the exact model and update its firmware. Some models use VPN Client; newer supported models use VPN Fusion.
- In the Dashboard, create the protocol supported by that model and download the profile.
- In ASUSWRT, open VPN, then VPN Fusion or VPN Client, and add a profile.
- Choose OpenVPN or WireGuard as applicable and upload the TekLan file. Enter the Dashboard’s OpenVPN profile credentials if requested.
- Activate the connection. In VPN Fusion, assign the required devices to it. On older VPN Client models, activating the client may route the whole network.
Check: wait for ASUSWRT to show the connection as active, then test an assigned device. If it will not reconnect after an outage, deactivate and reactivate the profile.
UniFi GatewayOpenVPN or WireGuard VPN Client
Create the client and route traffic
- Confirm this is a Next-Gen UniFi Gateway or UniFi Cloud Gateway and update the UniFi Network application.
- Create and download a dedicated TekLan WireGuard or OpenVPN profile.
- In UniFi Network, open Settings, VPN and create a new VPN Client.
- Upload the profile. For OpenVPN, enter the username and password from Show OpenVPN credentials, not your TekLan VPN password.
- Save the client, then create a policy-based route or traffic route for the devices or networks that should use it. Creating the client alone does not send device traffic through the VPN.
Check: confirm the VPN Client is connected and test a device included in the traffic route. Also test a device outside the route to confirm the policy is scoped correctly.
OpenWrtLuCI OpenVPN or WireGuard client
Install the client packages first
- Back up OpenWrt and confirm there is enough free storage before installing packages.
- For OpenVPN, install
openvpn-opensslandluci-app-openvpn. For WireGuard, installwireguard-toolsandluci-proto-wireguard. - Create the matching TekLan profile and download it on the computer administering OpenWrt.
- For OpenVPN, open VPN, OpenVPN, upload the
.ovpnconfiguration and enable the instance. Use the Dashboard credentials where the profile requests them. - For WireGuard, create a WireGuard interface in Network, Interfaces and transfer the values from the TekLan
.conffile. Do not upload the private key to a conversion website. - Assign the interface to the appropriate firewall zone and configure policy routing if only selected devices should use the tunnel.
Check: inspect Status, WireGuard for a recent handshake or the OpenVPN log for an established client, then test an assigned device.
pfSense PlusOpenVPN Client Import
Import the unified OpenVPN profile
- Back up pfSense Plus and install OpenVPN Client Import from System, Package Manager, Available Packages.
- Create an OpenVPN router profile in the TekLan Dashboard and download the unified
.ovpnfile. - Open VPN, OpenVPN, Import and select the TekLan file.
- Use WAN as the client interface unless the internet connection uses another interface. Enter the OpenVPN username and password shown by the Dashboard.
- Import the client, then inspect it under VPN, OpenVPN, Clients.
- Complete the required interface assignment, firewall rules, outbound NAT and policy-routing gateway rules before sending LAN traffic through it.
Check: confirm the client is up under OpenVPN status and test only a firewall rule or device deliberately assigned to the VPN gateway.
TP-Link and DecoOpenVPN VPN Client
Add the profile and choose client devices
- Check that the exact TP-Link or Deco model and firmware include VPN Client. This is separate from VPN Server.
- Create an OpenVPN profile in the TekLan Dashboard and download the
.ovpnfile. - On a TP-Link router, open Advanced, VPN Client. In the Deco app, open More, Advanced, VPN Client.
- Enable VPN Client, add a new OpenVPN profile, upload the file and enter the Dashboard’s OpenVPN profile credentials.
- Save and connect the profile, then add the devices that should use it to the VPN Client device list.
Check: confirm the profile reports connected and test a selected client. A device omitted from the VPN Client list should retain its normal route.
MikroTik RouterOS 7OpenVPN or recent WireGuard import
Import carefully, then add routing
- Update RouterOS 7, export a backup and confirm the router clock is synchronised.
- Create the required TekLan profile and download it to the computer administering the router.
- Upload the file through Files. For OpenVPN, use the RouterOS OpenVPN client import command and provide the Dashboard username and private-key passphrase when requested.
- Recent RouterOS 7 builds can import a WireGuard configuration, but support depends on the installed version. If import is unavailable, create the interface, peer and address using the values in the
.conffile. - Add the required route, routing table or routing rule and source NAT for the devices that should use the tunnel. Importing the interface alone does not define the complete traffic policy.
Check: inspect the OpenVPN interface state or WireGuard last-handshake, rx and tx values, then test an address included in the routing rule.